Leaks and Detection
A little leak can waste a lot of water. A slow drip can add up to 20 gallons a day, while a 1/16 inch faucet leak wastes up to 100 gallons in a 24 hour period.
Toilets are notorious for their hidden leaks and can waste hundreds of gallons a day undetected. Leaks occur when the toilet is out of adjustment or when parts are worn, so it’s important to check it periodically.
Most toilet leaks are at the overflow pipe or at the plunger ball. If it’s at the overflow, the water level is usually too high, although the overflow pipe sometimes may leak below the waterline. To prevent or stem leaks, gently bend the arm until the valve shuts off the water about a half inch below the top of the overflow pipe. Sometimes the valve is worn and will run like a leaky faucet and must be replaced. If you’re an experienced “do-it-yourself-er” you can probably do the job. Otherwise call a plumber.
Plunger-ball leaks aren’t as easy to spot. The best way is by dropping a few drops of food coloring into a tankful of clear water. If color shows up in the bowl, you probably have a leak at the plunger ball, either because the ball needs replacing or the mechanism is out of alignment.
Leak Detection Tips
Fixing a Leaky Faucet
Most leaks are in faucets, commonly caused by worn washers. You should check all the faucets in the house once or twice a year. If a faucet does leak, you will probably have to replace the washers. Below is a step by step guide to replace the washers in your leaky faucet.
Before You Start
Wrap a couple of layers of masking tape around any shiny parts of your faucet that the wrench might touch and scratch. If you leave metal uncovered, there’s a good chance it will be dinged before you’re through.
If your problem is a leak around the handle when you turn on the water, follow steps 1, 2 and 3. On a faucet with a packing nut, cover it with tape and tighten it gently. Never over tighten this nut. If the leak persists, remove the nut entirely, replace the packing washer underneath, and reassemble the faucet.
To repair a leaky stem that has an O-ring, follow steps 1, 2 and 3. Pinch the O-ring on the stem to get a finger hold, then pull it off. Replace with an exact match that has been lubricated with a little grease. Reassemble the faucet.
Tools You May Need

- A roll of ¾-inch masking tape
- 3-inch blade screwdriver
- 3-inch Phillips screwdriver
- 8-inch adjustable crescent wrench
The screwdrivers should cost about $2.00 each and the wrench about $6.00. It’s a good investment that you’ll use repeatedly on projects around the house.
Step 1
Check whether the faucet is dripping hot or cold water. You may only have to fix one handle unit, not both. Then shut off the water supply valves beneath the sink. If they aren’t there or if they don’t work, turn off the master supply for the whole house. Turn on both faucets to let the water drain out.
Step 2
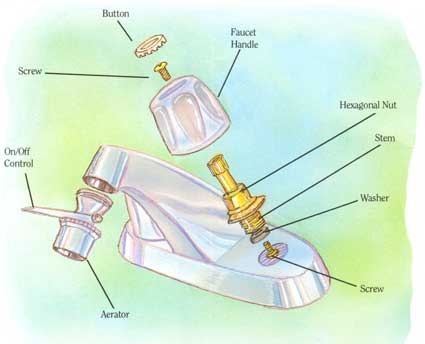
If there’s a decorative plastic button on top of each handle, just slip the blade of your screwdriver under the edge and twist. It should pop right off. Unscrew the screw underneath and pull or pry off the handle. Sometimes, because of the leak, corrosion makes it stick. Try wiggling it back and forth while prying upwards with the screwdriver blade. But never bang the handle free—the inner workings might break.
Step 3
What you see beneath the handle is called the stem. Fit your wrench to the large six-sided nut and loosen it. It may unscrew clockwise or counterclockwise, so if it doesn’t loosen one way, try the other. Then unscrew with your fingers until the whole stem lifts out of the faucet.
Step 4
On the bottom of the stem there’s a screw holding a rubber washer in place. Unscrew it, put in a new washer of the same size and replace the screw.
Step 5
Rub a little petroleum jelly on the threads of the stem. Then screw the stem back into place, tightening it with your wrench. Put the handle back on and turn on the water supply.